Profile

My photo
Just another anime enthusiast.

Sunday, July 5, 2009

00Gundam Model Completed!

Yay, after a long time, I finished finished the gundam model I received as a get well gift. Thanks King and Kev ! Photos and description in the body of this post.

The model itself wasn't hard compared to the Master Grades (MG) that I usually build. This model is 1/144 scale whereas normal MG are 1/100 scale. The amount of pieces used for this model is also much less than those of a MG.

The difficulty is also lesser than a MG. There are much less detail also. However, once built, it doesn't look terrible compared to the larger and more detailed MG (and the increased price too). The joints are also pretty sturdy, allowing you to pose the model as your mind permits. This wasn't the case in the past. My first MG that I ever built, it was many years ago, I don't even remember ! But the first MG model I had was the ZZ Gundam. The joints were weak and over time, the hands could no longer hold up the weapons. This also applied to a HG that I built before, the Heavy Arms Custom from Gundam Wing.

The price of this HG (from what I could see on the price tag), was only around 30 dollars CDN, however a MG would cost about 70 dollars CDN. Around double the value. If you enjoy building things, I would suggest you try building HGs to get a feel for whether or not you truly enjoy collecting models. I find MG more satisfying to build because of all the mechanisms built into the model which makes it all the more special and interesting to build. Also note that there are less gundams in the MG series than HG series. Therefore, if you do plan to collect every gundam in the HG series vs the MG series, you could very well need to spend more money owning every HG gundam.

The reason being, basically every gundam anime, every mobile suit (even if they are mass produced), will have a HG model. However, MG models are usually specific mobile suits which are unique in a sense (either its a gundam, or its a mass produced suit given to only one pilot hence it is unique in that sense, an example would be Char's Zaku).

I haven't mentioned anything about Perfect Grade (PG) because even I myself have yet to build one. They cost around 200 dollars CDN on average in the stores I see around me. The price is a little upsetting because 200 dollars for one gundam I believe it kind of a waste. But do keep in mind that a PG model will be 1/60 scale with much more detail than a MG.

Also I heard from friends that from HG to MG to PG, less work is needed to make a gundam look nice. The work I am talking about is adding paint and panel lines. I myself haven't tried either of those things either. But most instruction booklets has a page or so talking about panel lines and the before and after effects of it. Quite nice, if I do say so myself. I'll need to find out what kind of pen or marker I need to do the lines. All I know is that, it has to be black and very fine.

After I finished building it, I was somewhat disappointed that the size was so much smaller than what I had imagined, it was smaller than my heavy arms custom HG I had built before. The detail is not bad for something of this size. The joints are also very stiff and well made. I don't expect joint problems even if I had changed its pose 100 times. Overall, since it was free, I can't complain about it, however, the size was disappointing when compared to any of my other gundam models (HG or MG). It was fun to build though, easy, a good way to pass time while recovering from surgery, since moving alot hurt.

Anyway, on with the photos.
The box art is shown in the beginning of the post.

Gallery:
Gundam:


Once again, thank you King and Kev. This is a tribute to your generosity.

Read more!
One of my Hobbies, Photoshop!

On top of collecting figurines/gundam models and looking at new release information/reviews of them, in my spare time, I would also use photoshop to edit pictures into wallpapers or digitally store tangible images (ie posters).

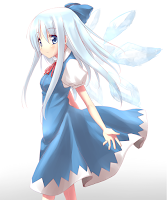
As promised, I will talk about the wallpaper of Cirno which I editted. First a vector was needed, a vector is the picture of focus, I would say (usually a person, in our case, an anime girl).

I might not know much about art, but being someone who enjoys it, I have a basic understanding. I also took traditional art and computer art in highschool. Computer art was the best and worst course at the same time. D: Basically, we were given tasks to do, but the teacher didn't teach us how to do it, we just looked for tutorials. So it was really it DIY course. Worst course ever... is what I want to say, but the freedom given because the course was layed out that way was kinda fun... It was a good experience nonetheless.

Basically, when I edit a work, first thing to do is find a vector, and here is the one I used.
So now that you have a picture, you need to crop out all the unnecessary bits, ie background. This part takes probably the most time for me, using the polygon lasso. Some people prefer magnetic lasso, so try different tools and do what fits. Beware though, from experience, I think magic wand isn't a very good tool for this kind of jobs, but if you wish to use it, its up to you.

After the vector picture is fully cropped out, ie the background is now transparent, its time to make the background !

Some people likes to make abstract backgrounds, in that case, you would probably go to google and find an abstract tutorial and use it. I on the other hand prefer something more fitting with correspondence to the vector. Since Cirno is a snow fairy, I decided that a snowy background was in order... Then came the hardest part of the whole work...

As I mentioned before in my first post, I CAN'T DRAW!
So how would I go around making snow? I went searching for tutorials on snow, but the only results were falling snow (which I also added to the picture, I'll cover that next). After loads of searching and couldn't find any good tutorials, I had to go another route.

It was a good thing I kept a folder of pictures I liked from various artists (random web browsing). And I found this previously.
Lucky! A snowy background which is somewhat anime-like. I couldn't use real snow photographs either because anime and reality doesn't mix well. So apologies for using other people's work, I hope I have their approval.

This message speaks for both images that I've used, because I found the images at imageboards, I don't have the source for them, so even though I wish I could put in the artist's homepage, but I can't... Sorry. >_< href="http://touhou.wikia.com/wiki/Flandre_Scarlet">Flandre above, then enlarged it into the new wallpaper with Cirno. Because of the available room, the section I took had a tree in it, I had to remove it. Why? Personal taste, I guess. So I took out the cloning tool, and made it disappear that way. For cloning, just try to make colours of the adjacent snow look similar to what you're working on. Though I was taught in computer art that when you clone you should actually clone from an area further away from where you're working, I find it easier to just clone from someplace closeby, since the colour differences will be lesser also.

Finally, I wanted to add some snowfall. That could be done by following simple photoshop tutorials, like this one.

I also drew in white circular dots for another type of snow. Using a brush with gradual fading edge of different size.

On top of the snowfall, I also added fog, which is just from using clouds with black and white, setting the opacity to something less than 100% and setting the layer type to screen.

When you're done, you'll have something like this. I made the resolution to 1680x1050 because thats my window resolution.
At this point, I would say it looks about done. But I wasn't satisfied with the wings not being transparent, so I did the last step to select the wings, cut them from the vector layer, paste it on another layer, then set the opacity down from 100%. Then I tested out my new tablet and signed my name on it. (Fun, but not as fun as using a real pen and signing it on a piece of paper). Haha...

This was what the final product looked like.
I will include a download link for the psd file of what I did, I hope it serves as a decent starting point for people who are interested in photoshopping. I am in no way a professional at this work but I have atleast done it a couple of times.
DL

Some other work.
Banner:


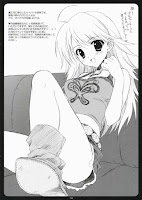
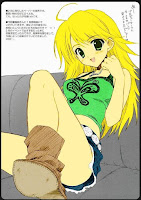
Colouring:


Read more!